How Many Apps Are in the Shopify App Store in 2026? A Clear Look at the Numbers
A clear look at how many apps are in the Shopify App Store in 2026, why the number changes, and what it means for merchants and developers.
Feb 9, 2026


Installing OpenClaw on a VPS involves selecting a suitable provider (DigitalOcean, Hostinger, or Hetzner), provisioning a server with at least 2GB RAM and Ubuntu 22.04, installing Docker, and deploying OpenClaw using the official installer script. After setup, configure your API keys, establish an SSH tunnel for secure access, and connect messaging channels like WhatsApp or Telegram through the web interface.
OpenClaw (formerly known as Moltbot and Clawdbot) has exploded in popularity as a self-hosted AI assistant platform that puts you in full control. Instead of relying on cloud services that monitor your data, OpenClaw runs entirely on your own infrastructure.
But here's the thing—installing OpenClaw on a VPS isn't as straightforward as clicking "install" and walking away. There are provider-specific quirks, memory constraints, networking configurations, and security considerations that can derail your setup.
According to DigitalOcean's technical documentation, smaller Droplet configurations consistently encounter out-of-memory errors during snapshot creation. The 1-Click Deploy OpenClaw they created addresses this by requiring minimum specifications and providing a security-hardened configuration.
This guide walks through the entire process, from choosing a VPS provider to accessing your OpenClaw interface and connecting messaging channels.
OpenClaw is an open-source personal AI assistant that can execute tasks, respond to messages, and integrate with multiple communication platforms. It supports WhatsApp, Telegram, Slack, Discord, Signal, iMessage, Google Chat, and MS Teams according to the official DigitalOcean documentation.
The platform offers multi-agent routing with isolated sessions, flexible model support (Anthropic Claude, OpenAI GPT, and local runtimes), and a messaging gateway architecture that keeps all your conversations in one place.
Running OpenClaw on a VPS instead of your local machine offers several advantages. Your assistant stays online 24/7 without draining your laptop battery. Cloud servers typically have better uptime and bandwidth. And you can access your OpenClaw instance from anywhere without port forwarding headaches.
DigitalOcean offers 1-Click Deploy OpenClaw starting at $12/month according to their February 2026 announcement, providing a security-hardened option for always-on agentic AI.
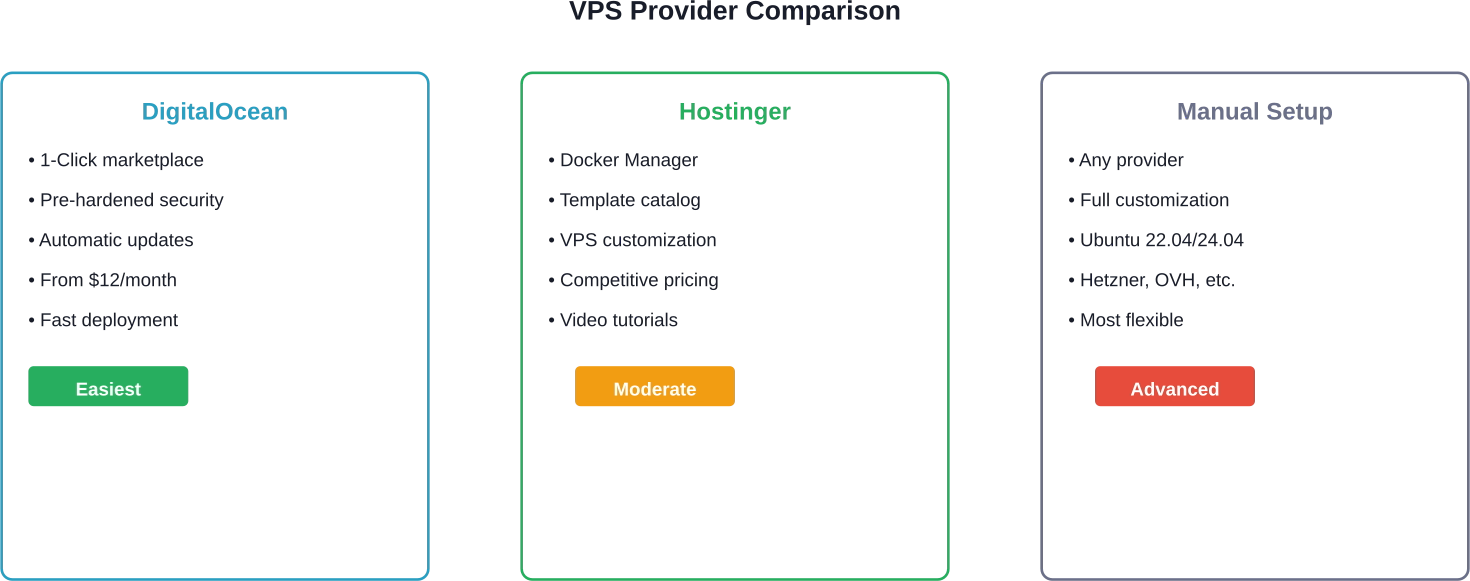
Three providers dominate the OpenClaw deployment landscape: DigitalOcean, Hostinger, and manual setups on providers like Hetzner or OVHCloud.
DigitalOcean launched their 1-Click Deploy OpenClaw in January 2026, offering the fastest path from zero to running instance. The marketplace deployment uses Packer for image provisioning and includes security hardening out of the box.
Their implementation solves a critical problem. During testing, DigitalOcean found that smaller configurations hit out-of-memory errors during snapshot creation. Their 1-Click solution requires a minimum $24/month Droplet size to match the snapshot's disk and memory requirements.
The DigitalOcean approach includes pre-configured firewall rules, automatic updates, and a stable installation path that community discussions frequently recommend for newcomers.
Hostinger provides OpenClaw through their Docker Manager catalog. The process differs from DigitalOcean's approach—you provision a VPS first, then deploy OpenClaw as a containerized application.
Hostinger's method gives you more flexibility in server configuration before installation. You can customize your VPS environment, install additional tools, and then add OpenClaw when ready.
For developers who want complete control, manual installation works on any Linux VPS running Ubuntu 22.04 or 24.04. This approach requires more steps but offers maximum customization.
Providers like Hetzner, OVHCloud, and Cherry Servers support manual OpenClaw deployments. The openclaw-stack repository on GitHub provides detailed setup guides for OVHCloud specifically.
OpenClaw won't run on bare-minimum VPS configurations. Testing shows consistent failures on instances with insufficient resources.
The minimum viable configuration requires 2GB RAM, though 4GB is recommended for stable operation. CPU requirements are minimal—a dual-core processor handles the logic and audio mixing threads without latency according to the h3sync technical guide.
Storage needs are modest. Allocate 30GB for the operating system, Docker images, and OpenClaw data. RAM usage typically stays under 512MB during normal operation, but compilation from source demands 4GB+ to expedite the linking process.
Operating system support is straightforward. Ubuntu 22.04 LTS and 24.04 LTS receive the most testing and community support. Debian-based distributions work, but you'll find fewer tutorials and troubleshooting resources.
Docker is mandatory for modern OpenClaw deployments. The official installation methods all use containerization. This simplifies updates, isolates dependencies, and standardizes the environment across providers.
Network access requires SSH for initial setup and administration. You'll also need the ability to create SSH tunnels for secure web interface access.
The DigitalOcean marketplace offers the fastest path to a working OpenClaw instance. This method handles security hardening, firewall rules, and dependency management automatically.
Sign up at digitalocean.com if you don't have an account. New users often receive promotional credits that cover initial testing costs.
Navigate to the Marketplace section from your dashboard. Search for "OpenClaw" in the catalog.
Select the OpenClaw 1-Click application. Choose your Droplet size—don't go below the 2GB RAM configuration.
Pick a datacenter region close to your location for lower latency. Select additional options like automatic backups if desired, though these increase monthly costs.
The deployment process takes 3-5 minutes. DigitalOcean provisions the server, installs dependencies, pulls Docker images, and configures the OpenClaw container.
Once the Droplet is running, connect via SSH using the credentials provided in your email.
OpenClaw requires API keys to function. You'll need at least one of these: Anthropic API key for Claude models, OpenAI API key for GPT models, or a local model configuration.
Environment variables live in the Docker configuration. Edit the docker-compose.yml file or use the DigitalOcean console to add:
ANTHROPIC_API_KEY=your_key_here
OPENAI_API_KEY=your_key_here
Restart the OpenClaw container after adding keys. The service won't respond to requests without valid API credentials.
OpenClaw's web UI doesn't expose directly to the internet by default. This is intentional security design.
Create an SSH tunnel from your local machine:
ssh -L 18789:localhost:18789 root@your_droplet_ip
Open your browser and navigate to http://localhost:18789. The OpenClaw interface should load, showing the gateway status and configuration options.
Hostinger's approach differs slightly. You provision the VPS first, then deploy OpenClaw through their Docker Manager.
Log into your Hostinger account and navigate to the VPS section. Select a plan with at least 2GB RAM.
Choose Ubuntu 22.04 or 24.04 as your operating system during checkout. Hostinger installs the OS and provides SSH credentials within minutes.
Access your VPS dashboard in Hostinger. Look for the Docker Manager or Application Catalog section.
Search for OpenClaw in the template catalog. Hostinger provides a pre-configured deployment that handles Docker installation and container setup.
Click deploy and wait for the automated setup to complete. The process mirrors the DigitalOcean approach but uses Hostinger's management interface.
Hostinger provides a web-based environment variable editor in their VPS control panel. Add your API keys there instead of SSH-ing into the server and editing files manually.
The interface exposes common OpenClaw variables like ANTHROPIC_API_KEY and model selection preferences. Save changes and restart the application.
Check the logs in Hostinger's dashboard to verify OpenClaw started correctly. Look for messages indicating the gateway is listening and model connections succeeded.
Set up your SSH tunnel to access the web interface, just like the DigitalOcean method.
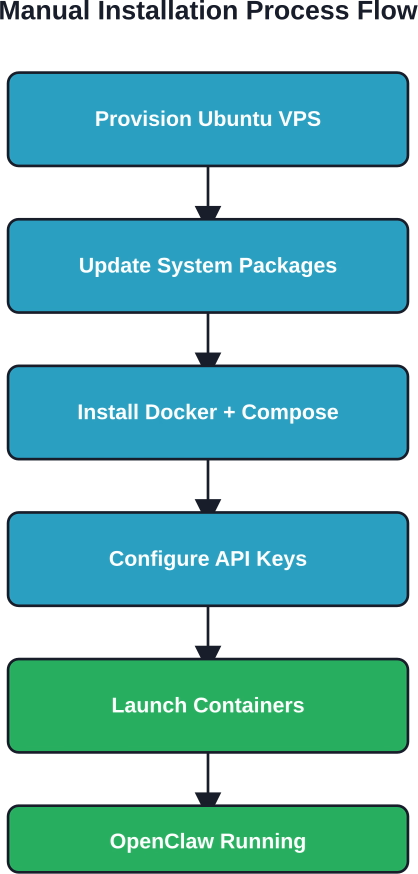
Manual installation gives you complete control but requires more steps. This method works on Hetzner, OVHCloud, Cherry Servers, or any provider offering Ubuntu VPS hosting.
Generate an SSH key pair if you haven't already:
ssh-keygen -t ed25519 -C "vps1-openclaw" -f ~/.ssh/vps1_openclaw_ed25519
The GitHub documentation from openclaw-stack recommends ed25519 keys for better security. Add a secure password when prompted—this decrypts the local private key during use.
Add your public key to the VPS during provisioning. If you missed this step, the OVH guide notes you can add it afterward by reinstalling the OS in the dashboard.
Connect to your server:
ssh -i ~/.ssh/vps1_openclaw_ed25519 root@your_vps_ip
Update the package list and upgrade installed software:
apt update && apt upgrade -y
This ensures you're building on a secure, up-to-date foundation. Security patches matter when exposing services to the internet.
OpenClaw requires Docker. Install it using the official Docker installation script:
curl -fsSL https://get.docker.com -o get-docker.sh
sh get-docker.sh
Verify Docker is running:
docker --version
docker compose version
Modern Docker installations include Compose v2 by default. You should see version information for both commands.
Download the official OpenClaw deployment repository:
git clone https://github.com/openclaw/openclaw.git
cd openclaw
The repository contains docker-compose.yml files and configuration templates.
Copy the example environment file:
cp .env.example .env
Edit .env with your preferred text editor:
nano .env
Add your API keys and configure model preferences. The minimum viable configuration includes at least one model provider key.
Start the OpenClaw stack:
docker compose up -d
The -d flag runs containers in detached mode. They continue running after you close the SSH session.
Check container status:
docker compose ps
All services should show "Up" status. If containers are restarting or exited, check logs:
docker compose logs
OpenClaw exposes a health check endpoint. Test it from within the VPS:
curl http://localhost:18789/health
A successful response confirms the gateway is listening and operational.
OpenClaw doesn't expose its web interface directly to the internet by default. This prevents unauthorized access but requires SSH tunneling to reach the UI from your local browser.
From your local machine, establish a tunnel:
ssh -L 18789:localhost:18789 root@your_vps_ip
This command forwards local port 18789 to the VPS's localhost:18789, where OpenClaw listens.
Keep the SSH session active while you work with the web interface. Closing the terminal terminates the tunnel.
The openclaw-runbook repository discusses Tailscale integration for persistent, secure access without manual tunnel creation.
Install Tailscale on both your VPS and local machine. Join them to the same Tailnet. Access the OpenClaw interface using the VPS's Tailscale IP address.
If Tailscale SSH isn't working, the troubleshooting guide recommends checking status:
sudo tailscale status
sudo tailscale status | grep ssh
Re-enable SSH through Tailscale if disabled.
Production deployments often use Traefik or Nginx as reverse proxies. The OVH documentation covers Traefik configuration for OpenClaw.
This approach enables HTTPS access, custom domain names, and automatic certificate management through Let's Encrypt. It requires additional configuration but removes the need for SSH tunnels.
OpenClaw's core value comes from integrating multiple messaging platforms into a unified AI assistant interface.
WhatsApp connection uses QR code scanning. Access the OpenClaw web UI and navigate to the Channels section.
Select WhatsApp and click "Connect." A QR code appears. Scan it with WhatsApp on your phone using the Linked Devices feature.
Once linked, messages sent to your WhatsApp reach OpenClaw. The assistant responds using your configured AI model.
Telegram integration requires creating a bot through BotFather. Message @BotFather on Telegram and use the /newbot command.
Follow the prompts to name your bot and choose a username. BotFather provides an API token.
Add this token to OpenClaw's Telegram channel configuration. The assistant now responds to messages sent to your bot.
Slack and Discord follow similar patterns. Create an application in each platform's developer portal, generate bot tokens, and add them to OpenClaw's channel configuration.
Documentation for each platform lives in the official OpenClaw docs at docs.openclaw.ai.
ClawHub provides a marketplace of extensions that add capabilities to OpenClaw. ClawHub has 33,000+ skills according to the theNetworkChuck OpenClaw setup guide.
However, according to the theNetworkChuck guide, 12% of ClawHub skills were found with malware during testing, though ClawHub partnered with VirusTotal to scan submissions.
Install skills from the web interface under the Skills section. Browse categories, read descriptions, and check ratings before adding anything to your instance.
Popular skill categories include home automation, data processing, web scraping, and calendar management.
OpenClaw requires ongoing maintenance to stay secure and functional.
Docker logs provide insight into OpenClaw's operation:
docker compose logs -f
The -f flag follows logs in real-time. Watch for errors, API failures, or connection issues.
Hostinger users can view logs through their web dashboard without SSH access.
OpenClaw releases frequent updates. The DigitalOcean marketplace version includes an update script.
For manual installations, update by pulling new Docker images:
docker compose pull
docker compose up -d
This downloads the latest containers and restarts services with new versions.
Community members reported that the DigitalOcean marketplace had initially installed Moltbot v2026.1.24-1 before the OpenClaw rebrand, with update scripts not recognizing the new version naming.
The theNetworkChuck guide suggests configuring recurring tasks to make your agent feel "alive."
Set reminders, periodic check-ins, or scheduled reports using OpenClaw's cron-like features. Configure these through the web interface or by adding tasks to your agent configuration.
Real talk: installations don't always go smoothly. Here are the most common problems and their solutions.
Symptoms include containers restarting repeatedly or the build process hanging.
Solution: Upgrade to a VPS with at least 4GB RAM. The 1GB and 2GB configurations are too small for reliable operation under load.
If http://localhost:18789 shows nothing, check your SSH tunnel first:
ps aux | grep ssh
Verify the tunnel process is running and using the correct ports.
Check that OpenClaw containers are actually listening:
docker compose ps
Restarting containers often resolves transient issues:
docker compose restart
Build failures typically indicate dependency problems or network issues.
Check Docker daemon logs:
journalctl -u docker
Ensure your VPS has stable internet connectivity. Retry the installation—network hiccups during image pulls cause intermittent failures.
If the gateway shows as down in the web interface, verify API keys are correctly configured:
docker compose logs | grep -i "api key"
Missing or invalid keys prevent the gateway from initializing.
Insufficient resources cause system hangs. This happens most often during Docker image builds on underpowered VPS instances.
Monitor resource usage during installation:
htop
If RAM usage hits 100%, the system will swap to disk and slow to a crawl. Upgrade your VPS or add swap space as a temporary measure.
Running an AI assistant on a VPS exposes it to internet threats. Take these precautions.
Configure UFW (Uncomplicated Firewall) on Ubuntu:
ufw default deny incoming
ufw default allow outgoing
ufw allow ssh
ufw enable
Don't open port 18789 to the world. Access OpenClaw through SSH tunnels or Tailscale only.
Keep the operating system and OpenClaw updated. Security patches matter.
Enable automatic security updates on Ubuntu:
apt install unattended-upgrades
dpkg-reconfigure --priority=low unattended-upgrades
Disable password authentication for SSH. Use key-based auth exclusively.
Edit /etc/ssh/sshd_config:
PasswordAuthentication no
PubkeyAuthentication yes
Restart SSH:
systemctl restart sshd
API keys are sensitive. Never commit .env files to version control.
Restrict file permissions:
chmod 600 .env
Only the file owner can read the environment configuration.
Running OpenClaw involves both infrastructure and API costs.
DigitalOcean offers 1-Click Deploy OpenClaw starting at $12/month according to their official announcement. This tier includes 2GB RAM, which meets minimum requirements but may struggle under load.
The 4GB RAM tier typically costs $18-24/month across providers. This configuration handles production workloads more reliably.
Hostinger's VPS pricing is competitive with similar tiers. Check the official websites for current pricing—rates change frequently.
Anthropic Claude and OpenAI GPT charge per token. Heavy usage accumulates costs quickly.
Monitor your API usage through each provider's dashboard. Set spending limits to avoid unexpected bills.
Local model deployments eliminate API costs but require more powerful VPS instances with GPU support, which are significantly more expensive.
Once basic installation works, several advanced configurations unlock additional functionality.
OpenClaw supports multiple agent configurations with isolated sessions. Configure different personalities, tool access levels, or model choices per agent.
The multi-agent architecture appears in the DigitalOcean documentation as a key feature for organizing complex workflows.
Beyond Claude and GPT, OpenClaw supports local and open-source models. Configure Ollama, LM Studio, or other OpenAI-compatible endpoints.
This requires editing model configurations and potentially installing additional software on your VPS.
The OVH setup guide details Traefik configuration. This enables HTTPS, automatic certificate renewal, and domain-based routing.
Steps include creating a proxy network, installing Traefik, configuring OpenClaw for Traefik, and setting up OVHcloud AI Endpoints according to their documentation.
The pavelzbornik openclaw-vps-setup repository provides Ansible playbooks for automated provisioning. This approach works for managing multiple OpenClaw instances or standardizing deployments.
Ansible handles user creation, Docker installation, firewall configuration, and OpenClaw deployment through infrastructure-as-code.
Each installation approach has trade-offs.
DigitalOcean's 1-Click deployment wins for simplicity. Security hardening comes pre-configured. Updates are streamlined. It's the best choice for developers who want to start using OpenClaw immediately without infrastructure concerns.
Hostinger's Docker Manager approach balances ease-of-use with flexibility. The web interface simplifies management for those uncomfortable with command-line operations. Good for non-technical users.
Manual installation on any VPS offers maximum control. Choose your exact provider, customize every aspect, and optimize costs. But you handle all maintenance and troubleshooting yourself. Best for experienced developers who need specific configurations.
Getting OpenClaw running is just the beginning. The DigitalOcean tutorial "So You Installed OpenClaw on a Digital Ocean Droplet. Now what?" covers practical next steps.
Start by connecting at least one messaging channel. Test basic interactions. Ask your assistant simple questions to verify model integration works.
Install a few skills from ClawHub that match your use cases. If you manage smart home devices, add home automation skills. For productivity, try calendar and task management extensions.
Configure cron jobs and scheduled tasks. Regular check-ins make your assistant feel more interactive.
Set spending limits on API keys to control costs during experimentation.
Join community discussions on Reddit, Discord, or GitHub. Community insights help troubleshoot issues and discover advanced workflows.

If you are installing OpenClaw on a VPS, you are probably working through setup and testing decisions. Extuitive fits a different part of that workflow. It is built to predict ad performance before launch, so teams can review creatives early instead of relying only on live testing after budget is already in play.
Talk with Extuitive to:
👉 Book a demo with Extuitive to see how pre-launch ad review works.
Installing OpenClaw on a VPS transforms a fascinating open-source project into a production-ready AI assistant accessible from anywhere. The process ranges from DigitalOcean's beginner-friendly 1-Click deployment to advanced manual installations with complete customization.
Start with DigitalOcean if you want the fastest path to a working system. Their security-hardened marketplace application handles configuration complexity automatically. Hostinger offers a middle ground with Docker Manager templates and web-based management. Manual installation suits experienced developers who need specific provider choices or custom configurations.
Regardless of method, adequate resources matter. Don't skimp on RAM—4GB configurations provide headroom for reliable operation. Secure your instance with SSH key authentication, firewalls, and regular updates. Monitor API usage to control costs.
The real value emerges after installation. Connect messaging channels, install skills, and configure recurring tasks. Your OpenClaw instance becomes more useful as you customize it to your workflows.
Ready to deploy your own AI assistant? Choose a provider, provision a VPS with adequate resources, and follow the installation steps for your selected method. Start with basic configuration and expand capabilities as you become comfortable with the platform.


