Best AI Tools for Creating Profitable Facebook Ads in Seconds
Discover the leading tools that make building Facebook ads faster. From native tools to AI creators, cut guesswork and boost your campaign results now.
Mar 24, 2026


If you run a Shopify store and use QuickBooks, syncing the two sounds simple on paper. In reality, it’s one of those things that can quietly go wrong if it’s not set up with care. Duplicate revenue, missing fees, payouts that never match – most store owners only notice the problem once reports stop making sense.
The good news is that syncing Shopify and QuickBooks does not have to be messy or confusing. When you understand how the connection works and what decisions actually matter, you can keep your books clean, predictable, and easy to review. This guide walks through the practical side of syncing Shopify and QuickBooks, focusing on what works in real businesses, not just what looks good in setup screens.
If you’ve ever tried manually copying Shopify order data into QuickBooks, you’ve probably realized pretty quickly that it just doesn’t scale. It might feel manageable at first, but things change fast once you’re dealing with dozens or even hundreds of orders each day. Refunds, processing fees, and taxes all get tangled up in your payout deposits, and before long, your accountant is asking for numbers you can’t easily explain.
This is exactly where syncing comes in. A proper integration helps you keep clean records of your sales, fees, refunds, and payouts. It gives you a real-time view of your store’s financial picture and makes tax season way less stressful. Plus, it cuts down on all the little mistakes that tend to pile up when you're typing things in by hand.
But here’s the thing most store owners miss: syncing only works if it’s set up the right way. And that’s where things usually get tricky.
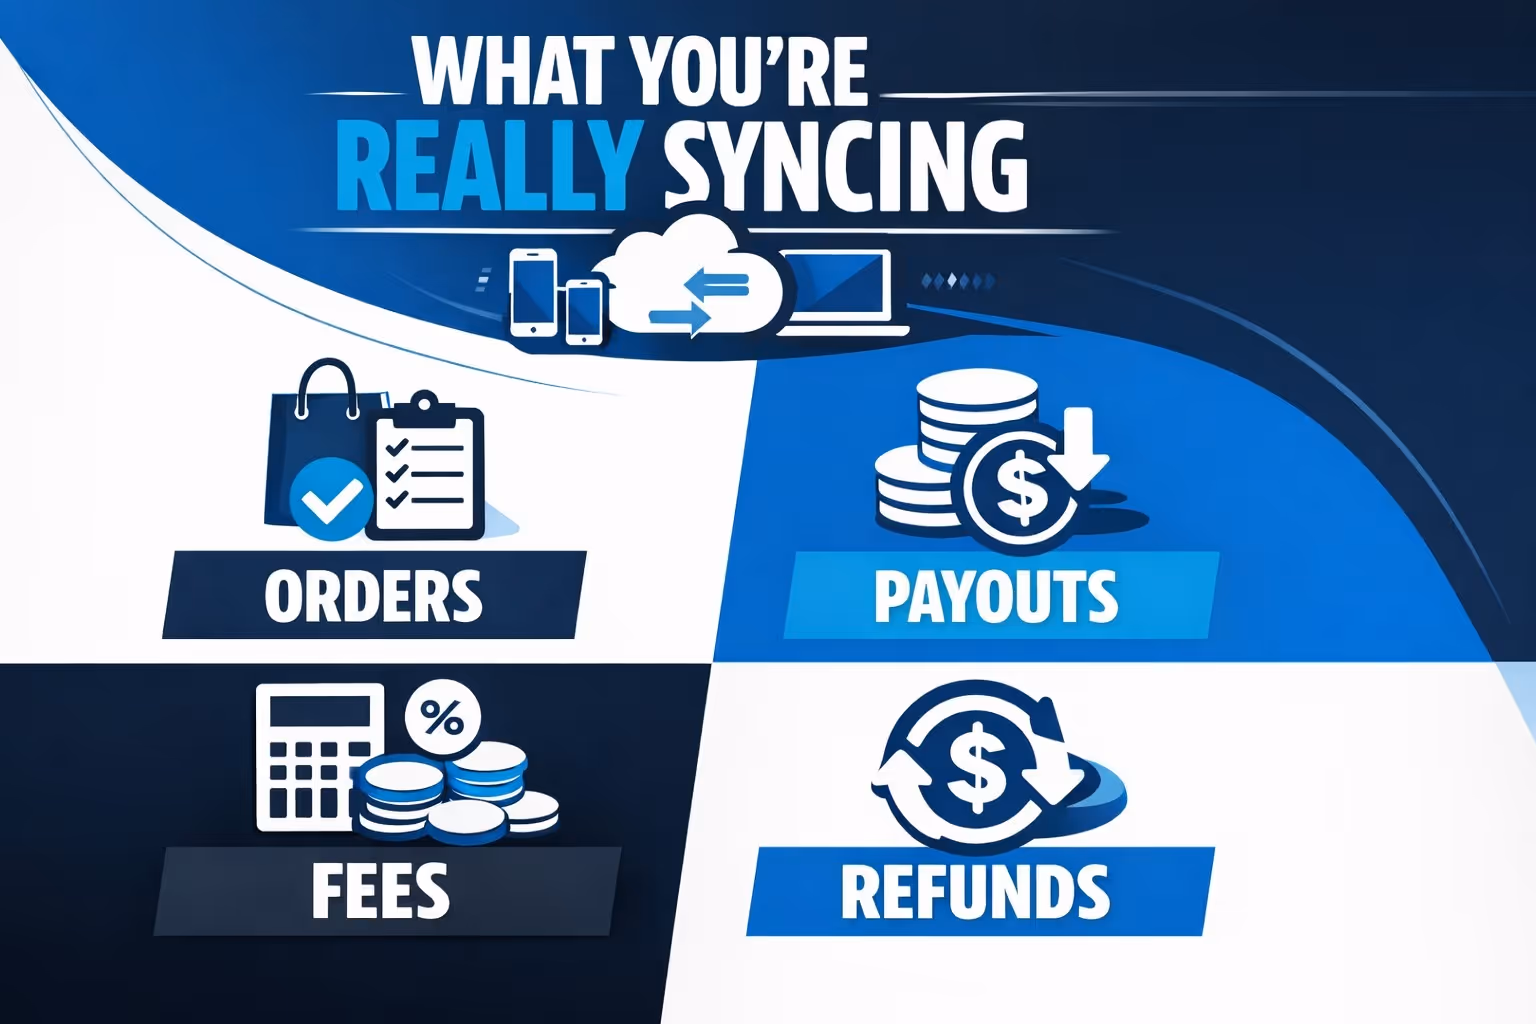
A good integration doesn’t just dump raw data into QuickBooks. It should separate the pieces that matter for bookkeeping.
Here’s what a proper sync handles:
Understanding this structure helps you decide how detailed your sync should be.
There’s no single “right” way to sync Shopify and QuickBooks. Some stores only need high-level sales numbers, while others require detailed transaction data for every order. The approach you choose depends on how hands-on you want to be and how complex your accounting needs are.
This approach relies on the standard integration options provided within the Shopify and QuickBooks ecosystem. It’s often the starting point for small to mid-sized stores.
What this setup usually supports:
Things to be careful with: Inventory syncing can cause issues if stock levels are not properly set up in QuickBooks. Syncing both orders and payouts at the same time can lead to duplicate revenue if not mapped correctly.
Best suited for: Store owners who are comfortable adjusting accounting settings and want direct control over how data flows.
This option focuses on automation while still allowing review and control. It’s often chosen by sellers who want cleaner data without managing every accounting detail manually.
Common features of this approach:
Why some stores prefer it: It keeps QuickBooks less cluttered, reduces bookkeeping mistakes, and makes reconciliation easier, especially with high order volumes.
Best suited for: Businesses that value accuracy and automation but don’t want to manage accounting configurations every day.
This setup is designed for larger or more complex operations, especially those selling across multiple stores or platforms.
What this approach typically includes:
When it makes sense: You sell on more than one platform, you have staff or an accountant managing books, or you need deeper reporting and tighter controls.
Best suited for: Growing ecommerce businesses that need scalable, accountant-level visibility across all sales channels.
No matter which method you choose, the goal stays the same: accurate records, predictable reports, and fewer surprises when you open QuickBooks. The key is picking the approach that matches your store’s complexity and your comfort level with accounting tools.
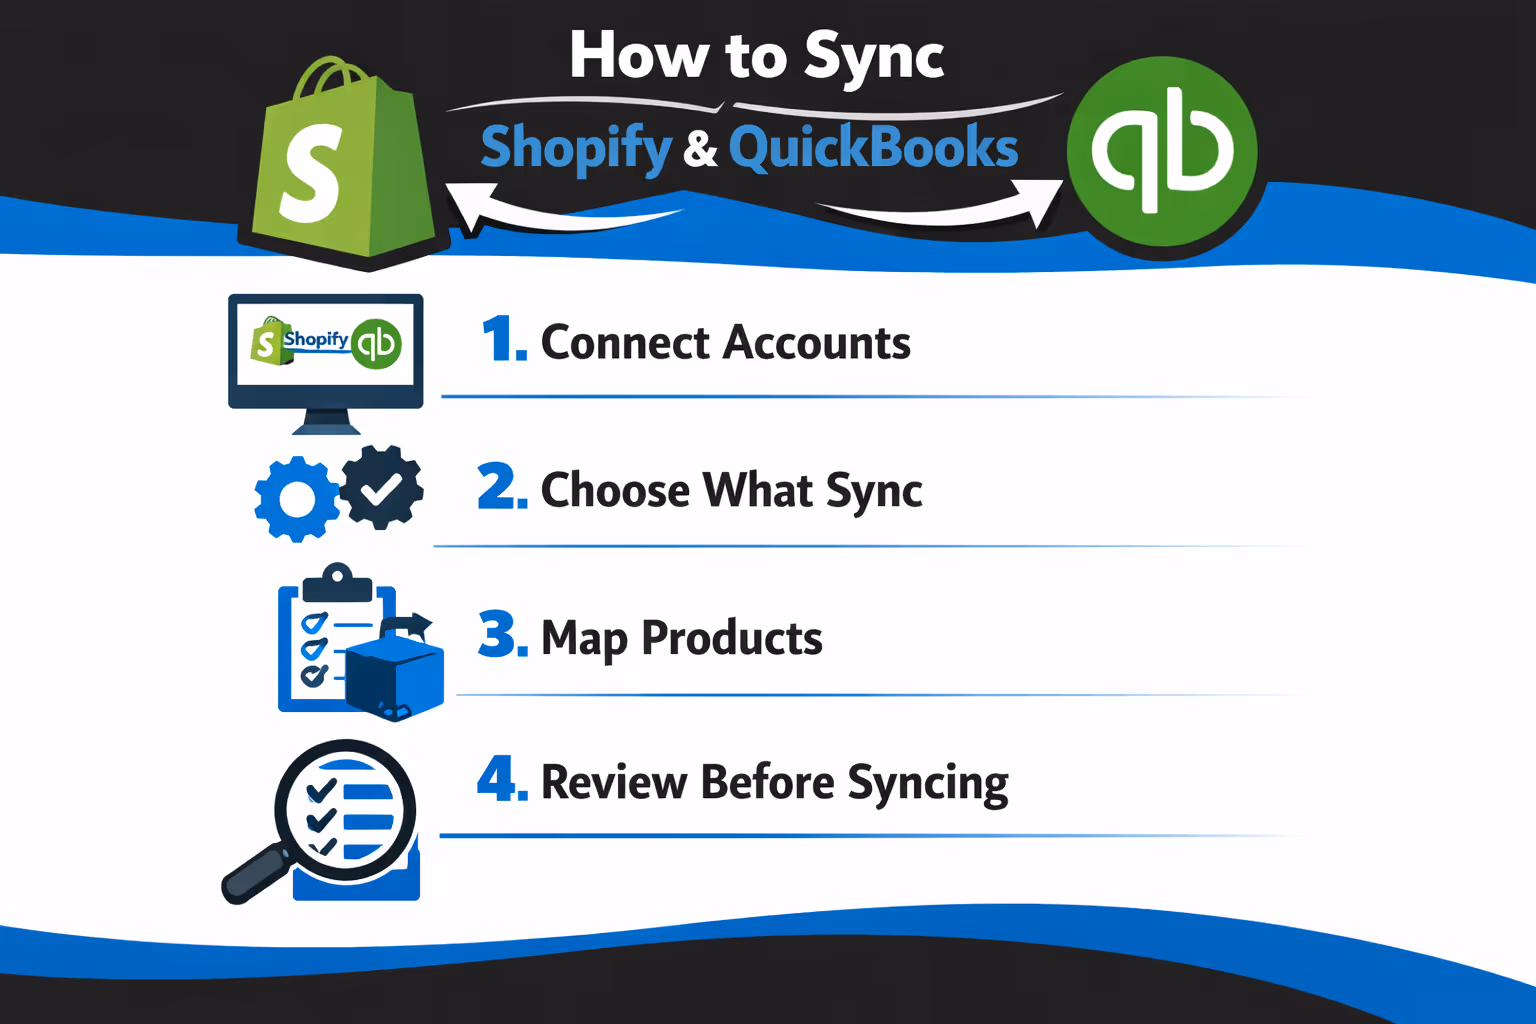
If you're ready to sync your Shopify store with QuickBooks, here’s a straightforward way to do it. The exact steps can vary depending on which tool or method you use, but the core process usually looks something like this:
Start by logging into your QuickBooks Online account. From there, go to the apps or integrations section and search for a Shopify connection option. This could be a native QuickBooks connector or another method offered through your accounting platform. Once you find the connection tool, follow the prompts to authorize access between QuickBooks and your Shopify store.
After connecting the two platforms, you’ll be asked to configure what data should sync. This includes orders, payouts, refunds, taxes, and sometimes inventory. You’ll also choose whether you want to sync individual transactions (itemized) or group them together in summaries (daily or weekly totals). Pick the option that fits your reporting style and order volume.
Next, you’ll need to match your Shopify products with their equivalents in QuickBooks. This can be done using SKU codes or product names. You’ll also assign income accounts, expense accounts, and tax codes so each sale lands in the right place in your books. It’s worth taking a few extra minutes here to get the mapping right.
Before turning on automatic syncing, it’s smart to run a few manual syncs first. Look at how the transactions appear in QuickBooks. Make sure the numbers line up, the product categories are correct, and nothing looks off. If something’s wrong, go back and adjust the mapping or sync settings.
Once everything looks good and you’re confident in the setup, you can turn on auto-sync. This will keep your data flowing between Shopify and QuickBooks without needing constant attention. Some sync systems update data daily by default, while hourly sync may require extra settings or apps.
Even with a clean setup, it’s a good idea to check in now and then. If you add new products, change SKUs, or update your tax settings, make sure the sync reflects those changes. A quick monthly review can save you a headache later.
No matter which tool you choose, you’ll face some important setup choices. Don’t let this trip get you up.
Most often, tools allow inventory syncing from Shopify to QuickBooks. However, some of them may involve syncing inventory back into Shopify. Think carefully before syncing inventory both ways. It’s a common source of accidental overwrites.
When you sync Shopify with QuickBooks, one of the key decisions is how much detail you want in your records. Some businesses prefer an itemized approach, where every individual order is imported into QuickBooks with full customer, product, and tax details. This gives you complete visibility but can slow things down if your order volume is high.
Others go for a summary sync instead, where a single daily or weekly entry captures the overall totals. It’s cleaner and easier to manage but comes with less detail. The right choice depends on how deep you want your reporting to go and how much activity your store handles.
Matching products correctly is a small setup step that makes a big difference. If your items are consistently labeled with unique SKUs, using SKU matching is usually the safer bet. It tends to be more reliable and avoids confusion, especially when product names are similar.
Matching by name can work too, but it's a bit riskier and more prone to errors if there's any inconsistency in how products are titled across systems. Either way, this isn’t a step to gloss over. If your mappings are off, you might end up with missing products in your reports or sales showing up in the wrong income categories.
Set income and expense accounts for sales, refunds, and fees. Otherwise, everything may dump into “uncategorized income,” which your accountant won’t love.
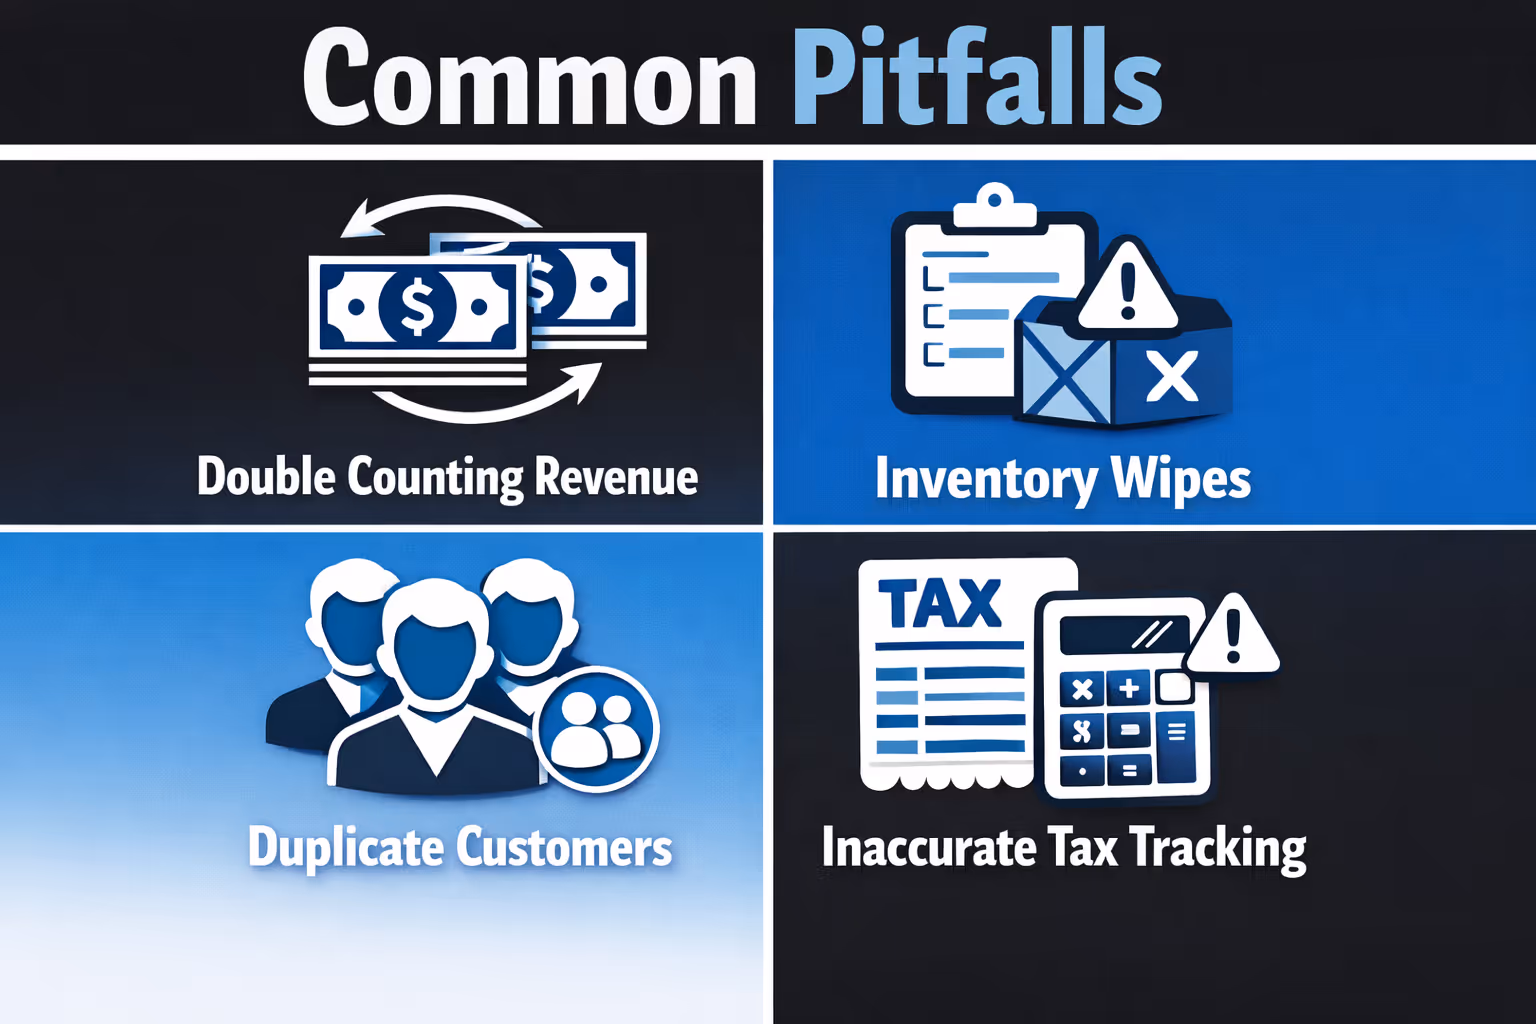
Even with the best tool, a few mistakes can make a mess. Here’s what to avoid:
Here’s a quick list to run through before you activate syncing:
Once you’ve verified everything looks clean, then turn on auto-sync.

While syncing Shopify and QuickBooks solves your financial workflow, it doesn't tell you which ads are actually worth running in the first place. That’s where we fit in. At Extuitive, we help you figure out which ad concepts will likely convert before you spend anything on them.
Our platform connects with your Shopify store to analyze your products, audiences, and creative ideas. Then we run those concepts through AI models trained on real ad performance data. In a few minutes, you’ll know which ideas are worth backing, and which ones should stay on the whiteboard. No guesswork, no wasted budget, and no waiting weeks for campaign results.
If you're already syncing your orders and payouts, it makes sense to bring that same clarity to your marketing. With Extuitive, Shopify brands can test ad ideas before launch, predict results across multiple segments, and double down on what actually works. Your books will be cleaner, and so will your creative strategy.
Syncing Shopify with QuickBooks isn’t just a time-saver. It’s how you keep your business financially sane.
If you’re not sure which approach fits your business, start with manual syncing first. Review the transactions. See how it affects your reports. Then turn on automation once you trust it.
A good sync doesn’t just save hours. It gives you peace of mind when you look at your books.


