Changing the theme on your Shopify store is one of those tasks that looks simple on paper but can quickly become frustrating if you skip preparation. The process itself takes only a few clicks in the admin panel, yet the real work happens before and after publishing - checking compatibility, backing up customizations, testing layouts across devices, and making sure nothing breaks on the live site. Stores that rush through it often end up with misaligned elements, missing features from apps, or even temporary dips in conversions while they fix problems.
In this guide we walk through the entire process based on how Shopify actually handles themes today. You will find practical steps to install or update a theme, what content stays and what might disappear, preparation steps that save hours later, and ways to minimize risks. The goal is straightforward: get a new look live without surprises.
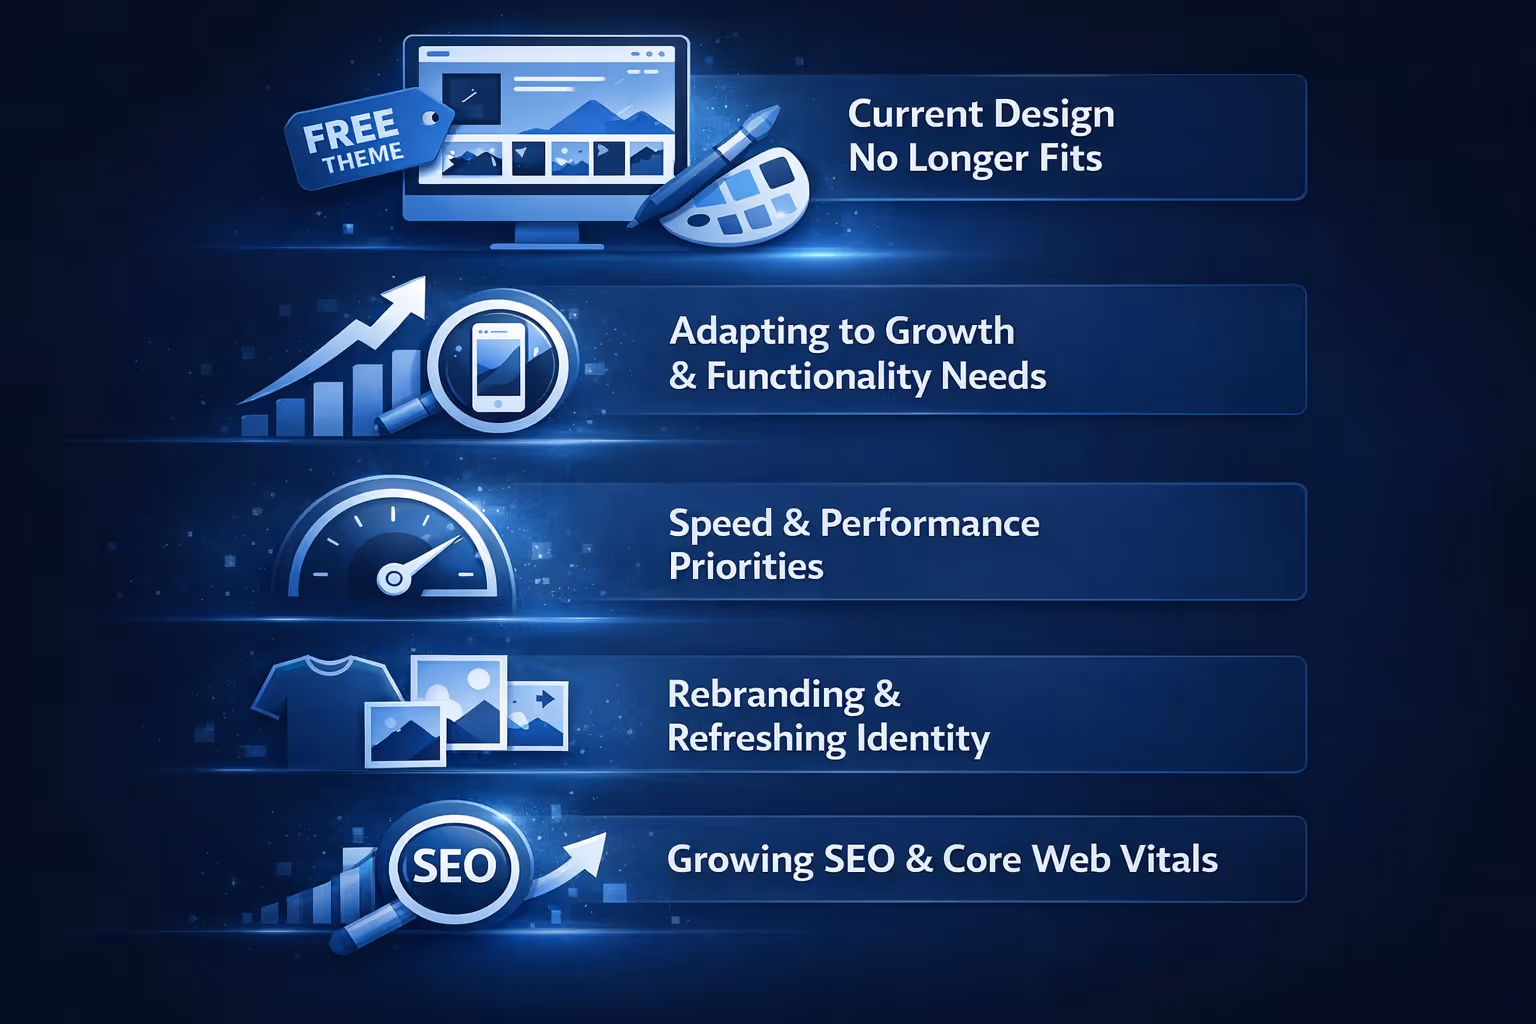
Why Stores Decide to Switch Themes
Most Shopify merchants begin with a free default theme - Dawn for newer stores or something like Debut for older ones. These options are solid at launch, but as the business scales they often start to feel restrictive.
When the Current Design No Longer Fits
The layout can stop aligning with updated branding. Product pages begin to look dated next to competitors. Mobile loading times slow down noticeably, especially on phones where most traffic now arrives.
Adapting to Growth and Functionality Needs
A switch becomes necessary when the theme no longer handles the volume of products, the variety of collections, or the specific apps that power sales. Merchants frequently move to improve mobile responsiveness and overall user experience.
Prioritizing Speed and Performance
Older or heavily customized themes tend to drag page speed down. Modern themes built for Online Store 2.0 manage images and scripts more efficiently, which helps keep load times in check.
Responding to Rebranding
Sometimes the change is purely visual. A logo refresh, new color palette, or full rebrand makes the existing theme feel mismatched with the current identity.
The Core Driver Behind Most Switches
Whatever the specific reason, the decision almost always comes down to the same realization: the current setup is quietly holding the store back from performing at its full potential.
The Growing SEO Angle by 2026
Google’s Core Web Vitals now place heavy emphasis on INP (Interaction to Next Paint). Older themes frequently struggle with JavaScript execution delays. Moving to a high-performance theme - whether Hydrogen-ready or optimized Liquid - has become a standard SEO tactic rather than just a cosmetic choice.
What Actually Happens When You Change a Theme
Shopify separates store data from theme files. Core information such as products, collections, pages, blog posts, navigation menus, and customer accounts lives in the database and stays completely untouched no matter which theme you activate. That is the good news.
The theme itself controls only the presentation layer - how those products and pages are displayed, which sections appear where, and what styles get applied. When you publish a new theme, Shopify replaces the old template files with the new ones. Any design changes, section arrangements, or visual tweaks you made in the previous theme editor do not carry over automatically because each theme has its own editor structure.
Custom code added directly to theme files (Liquid, CSS, JavaScript) stays tied to the old theme and will not appear in the new one unless you manually copy it over. The same applies to many apps that inject code snippets into the theme - those snippets often break or stop working until reinstalled or reconfigured for the new theme.
In short, your content remains safe, but the way it looks and some of the added functionality can vanish or need manual repair.
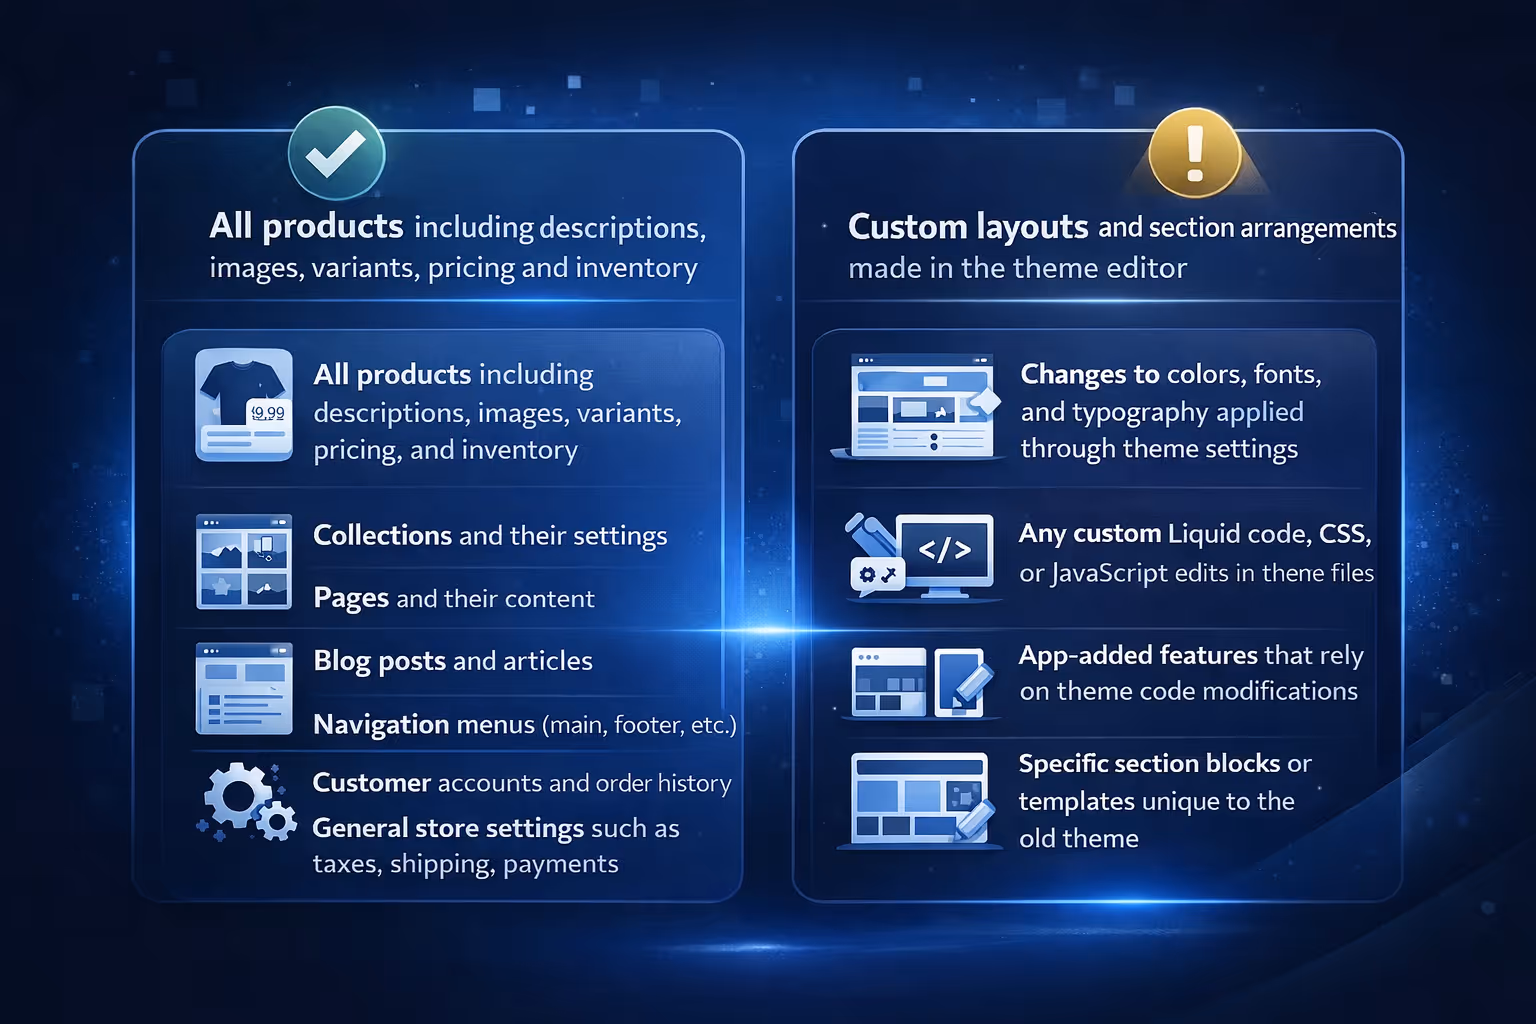
Content That Stays vs Content That Can Break
Understanding exactly what survives the switch helps set realistic expectations.
The following elements remain completely unaffected:
All products including descriptions, images, variants, pricing, and inventory
Collections and their settings
Pages and their content
Blog posts and articles
Navigation menus (main, footer, etc.)
Customer accounts and order history
General store settings such as taxes, shipping, payments
The following elements are likely to need attention or can disappear:
Custom layouts and section arrangements made in the theme editor
Changes to colors, fonts, and typography applied through theme settings
Any custom Liquid code, CSS, or JavaScript edits in theme files
App-added features that rely on theme code modifications
Specific section blocks or templates unique to the old theme
Custom product page layouts or alternate templates
Knowing this split upfront prevents most of the panic that happens when merchants see their carefully arranged homepage suddenly look plain or broken after publishing.
How Theme Customizations Get Lost
Every theme comes with its own set of customizable sections and blocks. When you drag a rich text block onto a page or adjust padding in an image banner using the editor, those adjustments live inside that theme's configuration. Switch to a different theme and those configurations do not transfer because the new theme uses a completely different set of section schemas.
The same logic applies to global theme settings like color schemes or typography choices. You have to recreate those manually in the new theme. This is why experienced merchants treat theme changes more like a redesign project than a quick swap.
Preparing Properly Before You Switch
Jumping straight to Theme Store → Publish is the fastest way to create problems. Preparation takes longer upfront but saves far more time on fixes later.
Document What Works Today
Open your live store and screenshot the key pages:
homepage
collection
product
cart
about page
Note down:
custom fonts
exact colors (grab hex codes)
special layouts
This reference becomes essential when rebuilding in the new theme.
Duplicate Your Current Theme:
In Online Store → Themes:
→ three dots on live theme → Duplicate
→ rename with today’s date (for quick rollback)
The duplicate stays in your library even after publishing a new theme.
Check All Installed Apps
Many apps inject code into theme files or depend on specific section IDs.
Check each app’s settings / documentation for:
theme compatibility notes
migration instructions
Especially verify tracking pixels, review widgets, upsell scripts.
Collect Custom Code
In Edit code of the current theme, scan:
theme.liquid
layout files
CSS files
snippets
Copy anything custom (added by you or a developer) into a text file - you’ll likely need to paste it into the new theme manually.
Set Up / Verify Analytics Early
Make sure Google Analytics (or your tracking tool) will correctly record both old and new themes.
This lets you compare performance right after going live.
Choosing the Right New Theme
The Shopify Theme Store offers dozens of options, both free and paid. Third-party marketplaces have even more. Picking one requires balancing looks with technical needs.
Focus first on whether the theme supports Online Store 2.0. These themes use sections and blocks that give far more flexibility without touching code. Older themes (vintage) limit what you can do in the editor and often load slower.
Look at the demo carefully. Switch between desktop and mobile views. Add a few products to a cart in the demo to see how the checkout flow feels. Pay attention to typography, spacing, button styles, and how images scale. If the demo feels cramped or slow even with placeholder content, the live version will likely feel the same.
Check compatibility with your must-have apps. Most theme pages list supported apps or at least show which features work best with popular ones. When in doubt, search the app's support docs for the theme name or reach out to the developer.
Read recent reviews. Look for comments about updates, bug fixes, and support response time. Themes that have not been touched in over a year can cause headaches with newer Shopify features.
Consider page speed from the start. Modern themes optimize images better, use lazy loading where appropriate, and avoid heavy scripts. A faster theme can improve both user experience and search rankings over time.
Once you narrow it down to two or three options, add each to your theme library and spend time customizing a preview. The one that feels closest to your vision with the least manual work usually wins.
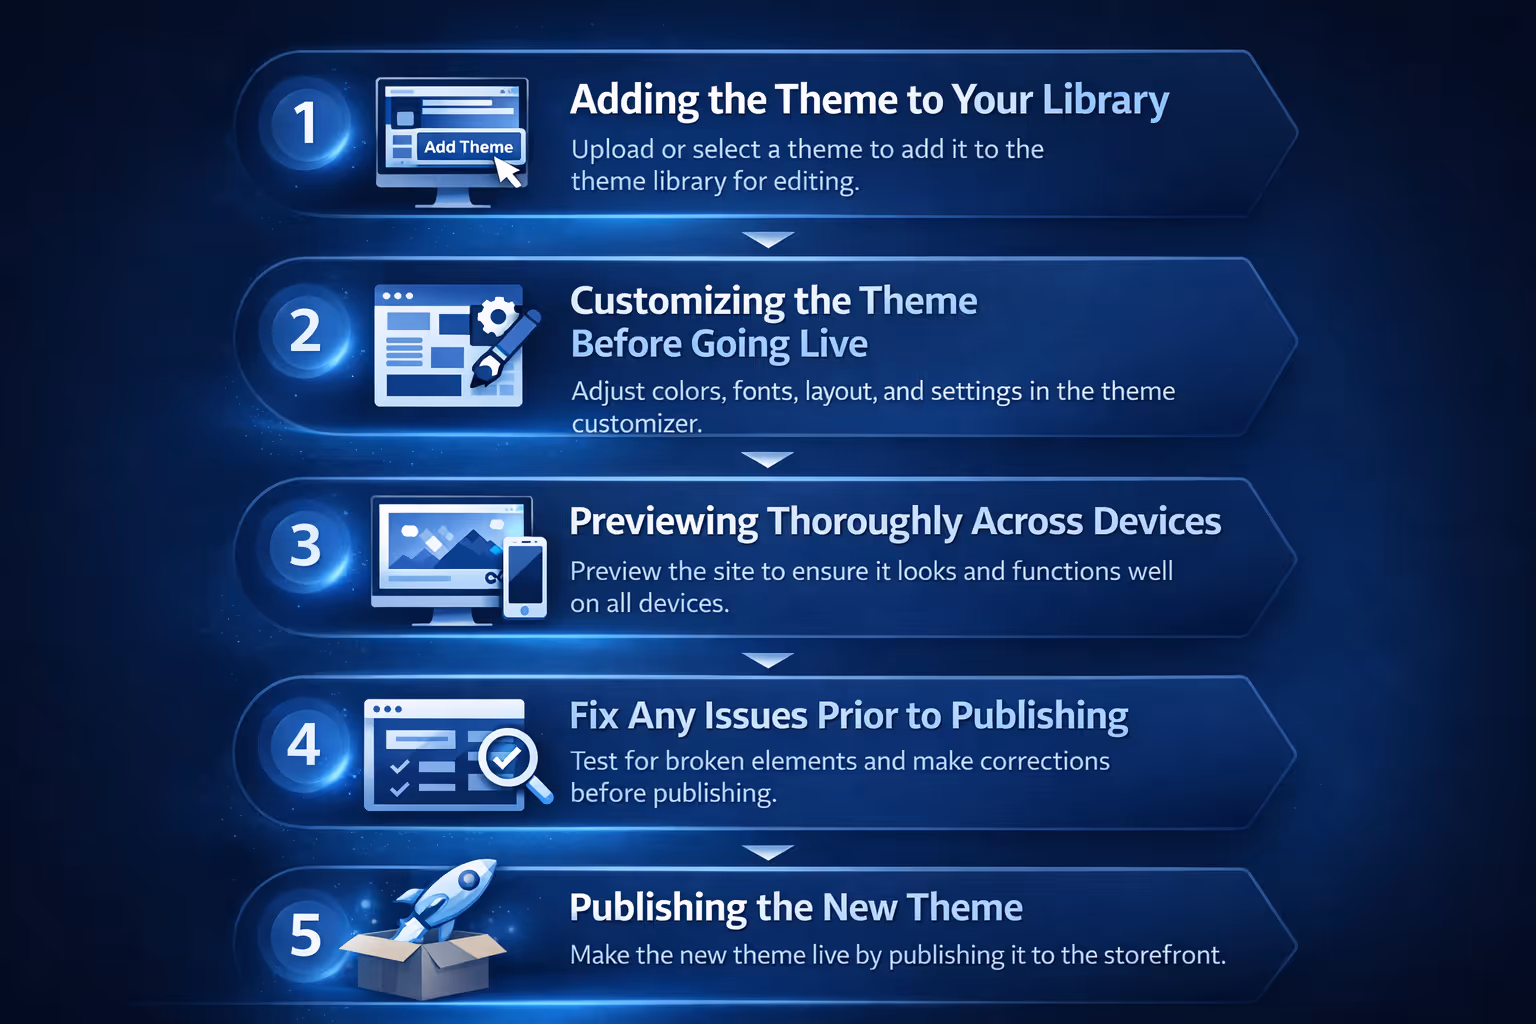
Step-by-Step: Installing and Publishing a New Theme
The process of getting a new theme live follows a clear, repeatable sequence. Breaking it down into distinct stages makes it easier to stay organized and avoid skipping critical checks.
№1: Adding the Theme to Your Library
Start by bringing the theme into your Shopify admin so you can work on it without affecting the live store.
Go to Online Store > Themes in your admin panel. Scroll down to the Theme library section and click Add theme.
If you're pulling from the official Shopify Theme Store, click Visit Theme Store, browse or search for the one you want, then select Try theme (for a preview) or Add.
If you purchased or downloaded it from a third-party marketplace (like ThemeForest), download the .zip file to your computer first, then click Upload theme and select the file.
Once added, the theme appears in your Theme library. At this point it is only available for editing and previewing - your live store remains on the current theme.
№2: Customizing the Theme Before Going Live
This is the most time-intensive part. Click Customize next to the new theme in your library to launch the visual editor.
Begin with the global settings, which apply across the entire store. Click the gear icon (Theme settings) in the left sidebar and configure these essentials:
Upload or adjust your logo and favicon
Define or edit color schemes (backgrounds, text, buttons, accents)
Set typography for headings and body text (fonts, sizes, weights)
Adjust page width and spacing between sections
Add links to your social media profiles
Choose the cart style (drawer, full page, or popup notification)
After the globals are set, switch to rebuilding page layouts section by section. Start with the homepage since it usually has the most custom blocks. Use the available sections and blocks to recreate your previous structure:
№3: Drag in image banners, sliders, or hero areas
Add featured collections, product grids, or rich text blocks
Place testimonials, newsletters, or multi-column layouts where they used to live
Work from your earlier screenshots of the old theme to match spacing, alignment, and content placement as closely as possible. Take your time here - small inconsistencies become very noticeable once the theme is live.
№4: Previewing Thoroughly Across Devices
Never publish without a full preview round. Click the Preview button in the top bar of the editor to open the theme in a separate browser tab.
Walk through the entire customer journey as a real visitor would:
Homepage scroll and interactions
Collection pages and filtering
Individual product pages (variants, add to cart, zoom)
Search results
Cart drawer or page
Checkout flow (you can usually reach this in preview mode)
Switch to mobile view by resizing the browser window or opening the preview link on an actual phone or tablet. Pay special attention to:
Text that gets cut off or overlaps
Images that don't scale properly
Buttons or links that are too small or unresponsive
Layouts that break on narrow screens
Fix any issues in the editor and refresh the preview until everything behaves correctly.
№5: Publishing the New Theme
When the preview looks and functions the way you want, head back to Online Store > Themes.
Locate the customized theme in your Theme library (it will show a green "Customize" button if you've edited it). Click Publish next to it and confirm the action.
Shopify immediately makes the new theme live and moves the previous one to unpublished status in the library. The old theme remains available - you can republish it anytime if something goes wrong and you need to roll back quickly.
Updating an Existing Theme Instead of Switching
Sometimes you do not need a completely new design - you just want the latest version of your current theme. Shopify supports this for Online Store 2.0 themes bought through their store.
When an update becomes available you see a notification in the admin. Click it to view release notes. You can choose manual or (in some cases) automatic updates.
For manual updates, add the new version to your library. Customizations made through the editor usually carry over, but code-level changes from you or apps do not. Review and re-apply those manually before publishing the update.
Automatic updates happen in the background for bug fixes and security patches. You get a notice after they apply. These rarely break anything but still deserve a quick check.
After Publishing: What to Check Immediately
The moment the new theme goes live, open your store in an incognito window and walk through the customer journey. Add products to cart, proceed to checkout, test search, click every button. Look for anything that feels off.
Monitor site speed using tools like Google PageSpeed Insights. Compare the old and new scores. A well-optimized theme should show improvement.
Watch analytics for the first few days. Look at bounce rate, time on page, and conversion rate. Small fluctuations are normal during a redesign, but a sharp drop signals something needs fixing.
Test SEO basics. Confirm that meta titles, descriptions, and headings still appear correctly in source code. Check that canonical tags and robots.txt are intact.
Reinstall or reconfigure any apps that stopped working. Many require you to add their snippets again or select new placement options in the updated theme.
If something critical breaks and you cannot fix it quickly, revert to the duplicated old theme. It takes seconds and gives breathing room to troubleshoot.
Leveraging AI Tools to Optimize After a Theme Change
Once the new theme is live and you've fixed the initial layout glitches or missing elements, that's when the real upside appears. We find that the biggest performance jumps don't usually come from the design refresh alone - they happen when you pair the updated storefront with smarter, faster ad creative testing. This is exactly where our approach at Extuitive becomes a natural next step for Shopify merchants.
We built Extuitive so you can simply connect your store, and then our AI agents - over 150,000 simulated consumers trained on real behavioral patterns - take over the heavy lifting. Right after a theme change, when your product pages, collection grids, and overall brand feel current and cohesive again, you feed that fresh visual identity into our system. Within minutes the agents generate dozens of ad variants (static images, carousels, short videos, copy angles) that are already tuned to match the new aesthetic. They run rapid simulations to predict which versions are most likely to drive clicks and purchases, factoring in how real people now perceive your updated store layout and vibe. We have noticed time and again that ads created before the redesign often clash with the new look - the messaging feels dated, the visuals don't align, or the call-to-action styling no longer matches the buttons and typography visitors are seeing on-site. Instead of manually shooting new creatives, running expensive test campaigns, or waiting weeks for consumer feedback, you get immediately actionable, data-backed options ready to deploy on Meta, TikTok, Google, or wherever you run traffic. The whole cycle from connecting the store to having validated, high-potential ads typically takes under 15 minutes.
This closes the loop cleanly: you change the theme to strengthen the foundation of the customer experience, then use our AI-driven generation and validation to make sure the marketing that sends people to that foundation actually converts. What starts as a visual refresh turns into measurable sales growth rather than just a prettier homepage. If you're curious how it would look with your specific products and new theme, connect your store and run a quick test - most merchants see useful insights right away.
Conclusion
Switching your Shopify theme is a manageable project when you treat it as a deliberate process rather than a quick task. The platform gives you solid tools to preview, customize, and revert, but success depends on preparation: duplicating the old theme, documenting key visuals and customizations, checking app compatibility, and testing thoroughly before publishing. Content stays safe, but design and added functionality require manual recreation. Done carefully, a theme change refreshes the store, improves performance, and aligns the look with current business goals without major disruptions.
FAQ
Does changing a Shopify theme delete my products or pages?
No. Products, pages, collections, blogs, navigation, and core store data remain completely intact. Only theme-specific customizations and code changes are affected.
Will my SEO rankings drop after changing themes?
Possibly, but usually only temporarily. If the new theme loads faster and keeps the same URLs and structure, rankings often recover or even improve. Major layout shifts or broken links can cause short-term issues.
Can I preview a new theme before making it live?
Yes. After adding it to your library, click Customize to edit and Preview to see the store as a visitor would. You can test everything without affecting the live site.
What happens to my apps when I change themes?
Apps that add code to theme files may stop working until reinstalled or reconfigured. Most apps function fine if they use Shopify's standard APIs, but always check compatibility first.
How do I keep my custom code when switching themes?
Custom Liquid, CSS, or JavaScript lives in the old theme files. Copy the relevant snippets manually and paste them into the corresponding files in the new theme using the Edit code area.
Is it better to update my current theme or switch to a completely new one?
If your current theme still fits your needs and just needs bug fixes or new features, update it. If the design feels outdated or lacks flexibility, switching to a modern theme usually gives better long-term results.
How long does it take to change a Shopify theme?
The technical switch takes minutes, but realistic preparation and customization can take anywhere from a few hours to several days depending on how much rebuilding is needed.
How much are you wasting on Meta ads? Connect your ad account. See your ad efficiency.