How to Start a Dropshipping Business in 2026
Learn how to start a dropshipping business in 2026. Follow proven steps to find suppliers, build your store, and launch with minimal investment.
Apr 14, 2026


Size confusion is one of the fastest ways to lose a sale. If you’re running a Shopify store and selling anything wearable – from t-shirts to tailored jackets – adding a size chart is more than just helpful. It’s essential. Not only does it reduce returns, but it gives your customers confidence right when they need it most: at the point of purchase.
Whether you’re building it into your theme with metafields or using an app, this guide breaks down exactly how to get your size chart where it belongs – on the product page, visible, and easy to use. No guesswork, no code anxiety. Just a clean walkthrough that works.
If you sell apparel or anything that’s size-dependent, there’s a good chance sizing confusion has already cost you sales. Whether it’s someone abandoning a cart because they’re unsure about the fit, or the returns piling up due to mismatched expectations, it adds friction you can’t afford.
Here’s the reality: online shoppers can’t try things on. They rely on you to give them the clarity they’d normally get in a fitting room. And your size chart is that clarity. Adding one to your Shopify store isn’t just a helpful extra. It’s a trust builder, a conversion booster, and a way to cut return rates down dramatically.
Before jumping into the how-to, it’s worth figuring out which approach fits your store best. Not all Shopify setups are the same, and your choice depends on how your theme is built, how many products you sell, and how hands-on you want to get with customization.
Let’s walk through both options so you can see what makes the most sense for you.
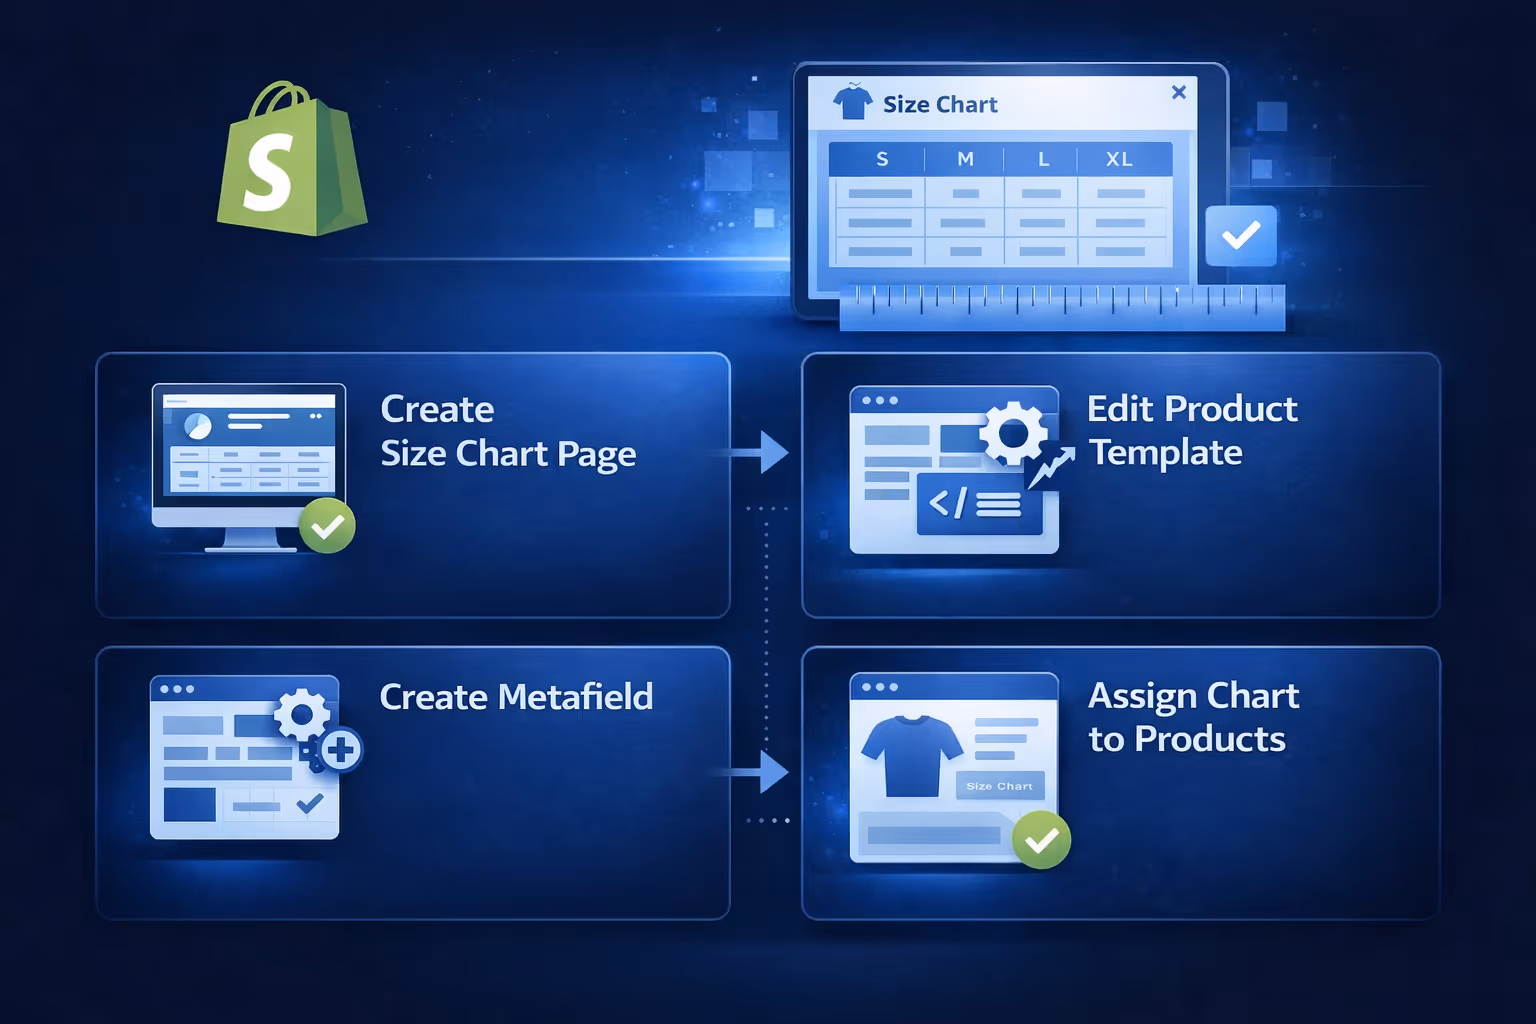
If you’re comfortable using Shopify’s theme editor and metafields, you can create a completely custom, flexible size chart solution without any third-party tools. This method gives you more control over when and where size charts show up.
Here’s how to do it the native Shopify way:
First, go to Online Store > Pages > Add Page and create a new page. Name it something like “Size Chart” and add your sizing table content in the editor. You can format it as a table, include visuals, or embed guides on how to measure.
Make sure the page is set to Visible and save it.
If you sell multiple categories (e.g. kidswear, shoes, jackets), create a separate page for each one. You’ll connect each product to the right chart later.
This metafield allows you to attach a specific page (your size chart) to individual products.
Here’s how:
Now each product has a new metafield field where you can assign a chart page.
Next, you need a template that includes a block for your pop-up or inline size chart. This is done in the theme editor.
Click Save, and you now have a dynamic template that pulls in chart data per product.
Final step:
Now only the products that need a size chart will show it. You can assign the same size chart page to multiple products by selecting it in their metafield settings, or create different pages for specific product types if needed.
It takes a few extra steps, but it’s flexible and future-proof.
If you prefer something quicker and more visual, third-party apps can help.
They may come with pre-built templates, drag-and-drop editors, and smart size recommendations – the exact features available depend on the specific app. Some even let you assign charts automatically by product tags, types, or collections.
If you're going this route, make sure you test your app thoroughly on both desktop and mobile.
Regardless of how you add it, your size chart needs to actually help shoppers. That means making it easy to read, accurate, and relevant to the product.
Here’s what to include:
Here is an example size chart for T-shirts:
A size chart without instructions is like a map without a legend. Show customers where and how to measure themselves.
You can add a simple diagram, list body points with tips (e.g. “Measure around the fullest part of the bust”), or use a quick bulleted guide.
Sample “How to Measure” tips:
Make it visual if possible. A quick graphic beats five paragraphs of text.
Don’t assume your customers all use the same sizing system. Add a regional size conversion table so someone shopping from Europe, Japan, or Australia can find their equivalent.
If you’re using an app, look for one that includes unit toggles or international presets.
It’s not just what the chart says, but where you put it that affects conversions.
Avoid hiding it in a long tab or at the bottom of the page. Shoppers shouldn’t have to hunt for something so important.
When it comes to placing your size chart, visibility is everything. The most effective spot is right next to the size selector, where customers are already making decisions. If you’re using a popup or floating link, keep it close to that area so it feels intuitive to click.
For inline charts, make sure they appear above the fold – you don’t want shoppers to scroll endlessly just to find basic sizing info. Clarity also matters. Label the link or button as “Size Chart” instead of something vague like “More Info.” And don’t forget mobile. Whatever setup you choose should load quickly and look clean on smaller screens too. If it's hard to spot or hard to tap, it’s not doing its job.
You want customers to see it the moment they wonder, “Will this fit me?”

At Extuitive, we help Shopify brands look ahead instead of reacting after the fact. One of the biggest causes of lost revenue in fashion ecommerce is sizing uncertainty, and we’ve seen how predictive data can step in long before a customer ever hits the “buy” button.
With our ad prediction engine, you can test creative variations and audience targeting before launch, but it goes deeper than just clicks. By connecting campaign performance with size-related purchase behavior, we help you spot friction points early, like which product sizes or styles drive the most uncertainty or returns. That insight lets you optimize your product pages, including the way size charts are presented or prioritized.
If your size chart is buried, too generic, or mismatched to the audience you're targeting, conversions will stall and returns will spike. Our forecasting models surface those blind spots in advance, giving you a chance to improve the user experience right where it matters most. Whether you're testing seasonal creatives or scaling a new category, knowing what works at the size level helps you spend smarter and sell more confidently.
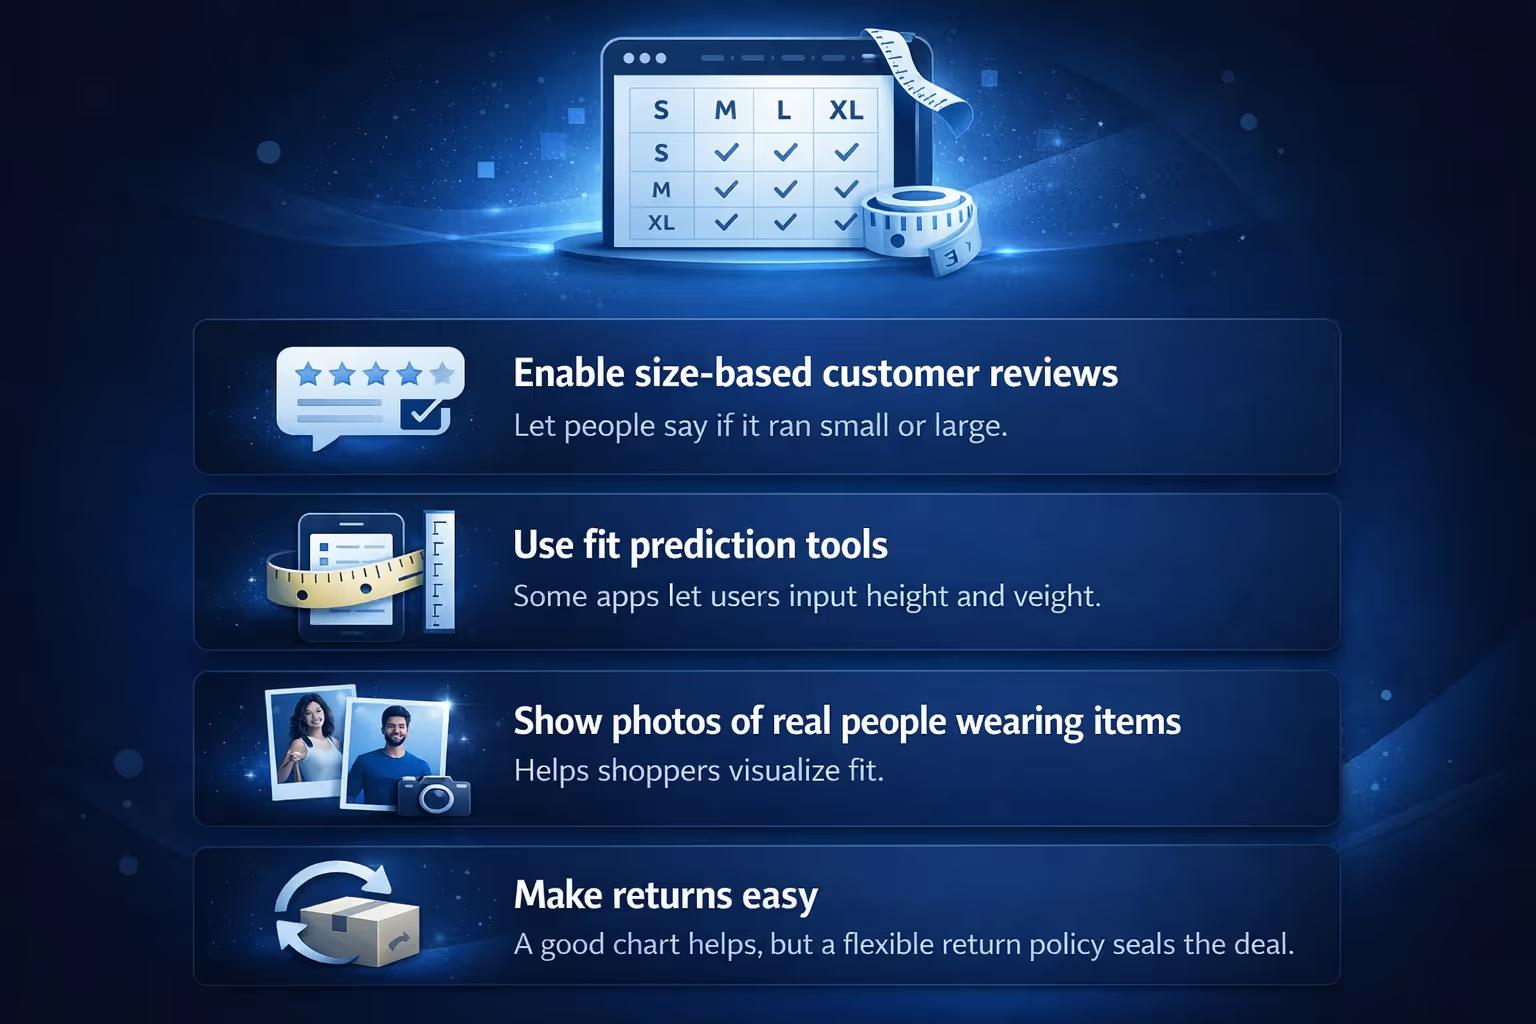
Size charts are a great first step, but if you want to push things further:
Adding a size chart in Shopify isn’t complicated, but it does require thought. The good news is, once you’ve set it up right, it keeps working in the background – quietly increasing trust, reducing returns, and improving your conversion rate.
If you’re just starting out, use an app. If you’re scaling or want more control, go with the metafield + template method. Either way, your customers will thank you for making sizing one less thing to stress over.
And if there’s one thing you take from all this: don’t bury the chart. Make it visible, useful, and tailored to what you sell. That’s what actually makes it work.


